Dear reader, you must be on top of the world after buying Explore Air 2. With its unique supplies, one can make their DIY dreams come true. Explore Air 2 can cut almost everything from cardstock to specialty materials. Besides, this Cricut model converts from an idea to ‘I Did It.’ Also, this craft plotter works with 6 tools that can cut, write, score, foil, and many more. Plus, this cut-die machine is compatible with the free Design Space app for designing various digital projects.
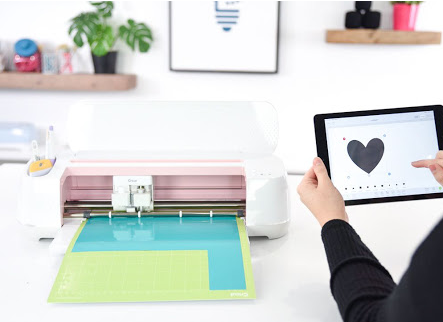
Apart from that, one can make their projects look more creative by giving them a personal touch. Further, before getting going with the crafting process, all the crafters need to know the Cricut Explore Air 2 Bluetooth setup on PCs and smartphones. After the setup, it will be easy as pie to finish the project on time. Keep going with the blog as you will learn about the setup & connection process.
Steps to Setup Cricut Explore Air 2 on Your PC Wirelessly
Equally important, one can also set up Explore Air 2 via Bluetooth with their respective PCs. To finish the setup process, the DIYer needs to observe the steps given below:
- First, plug in your cutting machine and turn it on.
- Second, connect your Cricut Explore Air 2 using the USB cable or pair it up wirelessly.
- Third, open the search engine of your choice and download Cricut software for your device.
- Next, sign in or create your Design Space by referring to the command appearing on your desktop screen.
- At last, you’ll be called for a test cut after the setup comes to an end.
After finishing up this cut-die machine setup with the desktop, the DIYer also gets the option of setting it up with mobile phones. In order to finish the process, they are supposed to examine the given below section.
The Process to Setup Cricut Explore Air 2 on Smartphones
Don’t worry if you’ve got a mobile device and want to set up this version using mobile. Take a look at the succeeding steps to finish up the setup process without facing any difficulties:
- Start the process by plugging your Cricut Explore Air 2 and powering it on.
- Next, start pairing up your smartphone using the built-in Bluetooth feature.
- Following this, install the Cricut app from the App Store/Play Store.
- After installing the app, you’ve to launch the app and create and sign in to your account.
- Further, tap the Menu dropbox and press the New Machine Setup option.
- At this time, choose your machine and finish the instructions to finish up the setup process.
- Later, you’ll get to know about the completion of the setup process when invited for a test cut.
Following the successful Cricut Explore Air 2 Bluetooth setup with a desktop & smartphone, the DIYer needs to pair up their devices. The process will allow them to craft the projects of their choice. In order to do that, they need to study the steps given in the coming sections.
Steps to Pair Cricut Explore Air 2 on Your Windows
Besides, the DIYer also pairs their craft plotter with a Windows built-in Bluetooth feature. The following steps will assist you in finishing the wireless pairing up with ease.
- Begin the method by checking that your Explore Air 2 is on and within the range of 10-15 ft of your PC.
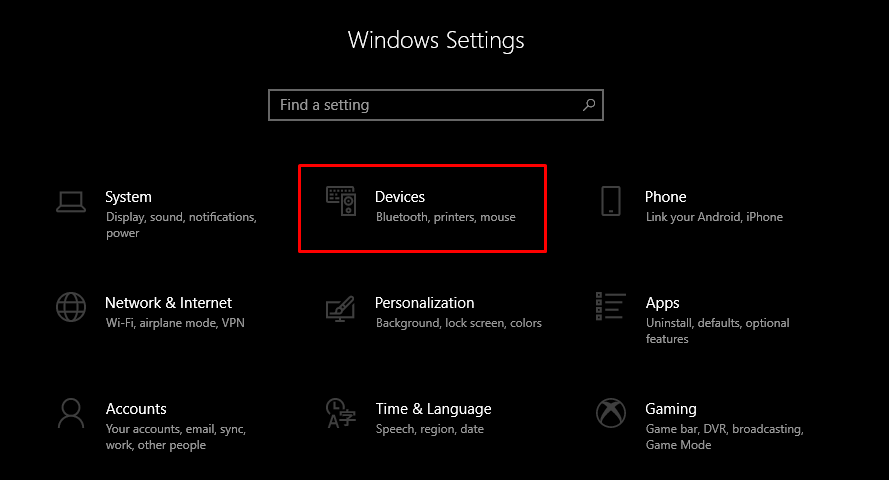
- Next, open the Start menu and choose the Settings option (given as a gear icon).
- Following this, you will land on the Windows Settings page and press the Devices option.
- After checking that your system Bluetooth is on, tap the Add Bluetooth or other device.

- Next, a pop-up window will open on your desktop screen.
- Now, press the Bluetooth and hold on till the scanning process is on its way.
- Further, choose your machine model appearing on the right side of the screen.
- Afterward, enter the PIN code inside the specific field and tick the Connect box.

- Finally, the pairing process with Windows OS will come to an end.
By following the above-said details, it will get more straightforward for the crafters to create custom crafts within the blink of an eye.
Frequently Asked Questions
Question: Which Custom Projects Can I Create with Explore Air 2 Machine?
Answer: After successfully pairing up & setting up this cut-die machine, the DIYer can consider the projects while celebrating festivals. Apart from that, these projects will also assist them in enhancing their creativity skills:
- DIY gift tags
- Custom Pillow Covers
- Personalize Banner
- Leather Earrings
- DIY T-Shirts
- Car Decals
- DIY Hat
- Customize Mugs
- Personalize Etched Glass
- Customize Glitter Tumbler
- Personalize Necklace
- Festival Cupcake Topper
- Makeup Pouch
Question: How Can I Connect My Explore Air 2 to My iOS Device?
Answer: To connect the Android devices with Cricut Explore Air 2, the user must consider the following steps:
- Ensure that your cutting machine is on and within 10-15 ft of your device.
- Afterward, open the Settings tab and enable the device’s Bluetooth.
- Next, allow your device’s Bluetooth and select your model from the list.
- Now, fill in the PIN code and tap the Pair button.
- Finally, the wireless pairing process will come to an end.
Question: How to Do Cricut Explore Air 2 Bluetooth Setup with Mobile Phones?
Answer: With the assistance of the coming step, the DIYer can easily set up their Cricut machine with the mobile phones:
- First, plug in your Explore Air 2 and power it on.
- Next, get the Design Space app for your mobile phones.
- Now, launch the app, sign in, and create your Design Space account.
- Afterward, tap the Menu drop box and choose the Cricut New Machine Setup option.
- At this time, select your machine and finish the on-screen instructions.
- Finally, complete the test cut after being informed about the setup will get complete.